Your own CDN
Written by Guillermo Garron
Date: 2015-04-03 17:40:00 00:00
How to speed up your site and it load faster
Loading speed is something really important for your site, because it gives your readers the best possible experience, there are a lot of different things you need to do in order to improve your site's speed, one of them is to put the content as close as possible to the readers. If you write about Spanish news, then chances are that most of your readers will be on Spain, and thus, your server should be located in Spain, that was easy. Now, what happens if your readers are spread all over the world, you have a pair of solutions.
- Put your server in U.S. or Europe as almost the whole world get there at reasonable speeds, this is the cheapest but not the best.
- Set your server in U.S. or U.K. and then use a CDN company like Fastly, MaxCDN or Cloudfront, prices are not as high as they used to be, MaxCDN is $ 10 per 100 GB, Fastly minimum order is $ 50 and Amazon is pay as you grow.
- Get your own Virtual servers located at well distributed Datacenters around world and create your own CDN
Taking out the first option, to decide between the other two is more a thing of taste, but one consideration should be taken into account.
Traffic of your site
If your site has a lot of traffic then the CDN may be a better solution, more points of presence and your content nearer to your readers, but if your site does not have too much traffic, then chances are that your content is not going to be present at the edge servers when the reader request it, then your own servers is a better solution, as you control how much time the assets are going to be in each one of your servers.
Set up your own CDN with Amazon and DigitalOcean or Linode
I am going to show here, how to set up your own network of servers to serve your site as near to your readers as possible. We are going to use Amazon Route 53, and Digital Ocean's VPS.
Amazon Route 53
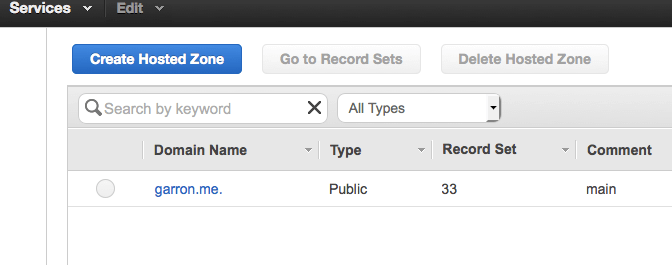
I will assume you already have an AWS account, if not, you must create one, then go to: Amazon Route 53 and create a new zone:
We have two options to route traffic to the specific servers, one is Latency routing and the other is Geo location routing, there is a comparison of Latency vs Geo location you might want to read.
Let's see both ways
Route 53 Latency configuration
Once you have your zone created, and resolving for your domain, create the records for your site, in this example, we will be working with www.garron.me
Go to Create Record Set and configure it as in the picture.
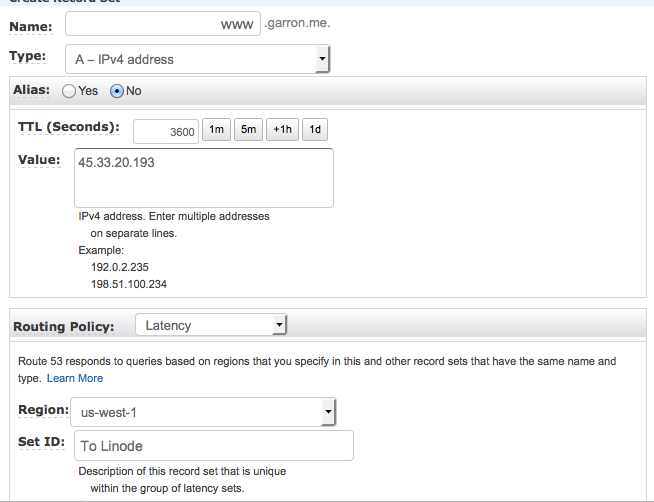
You need to, of course, change the IP to fit your needs, also, be sure to select the Region that is nearer to your Datacenter, if you choose DigitalOcean or Linode and select East Coast data center, then select use-east-1 region.
Create one record per each server you deploy, I recommend you deploying one on U.S. one on Europe and one in Asia, that way you should be serving all customers in the world
Route 53 Geo location configuration
In case you choose Geo location, once you have your zone created, create the records for your site. Once again go to Create Record Set and configure it as in the picture below.
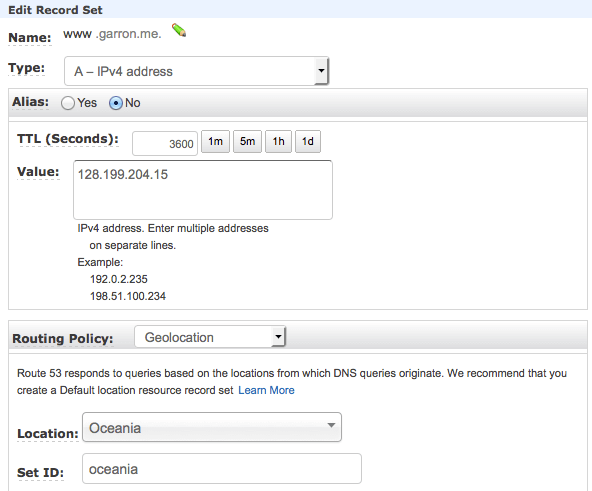
You need now to create as many records as fine tuned you want to distribute your traffic, you can go crazy and create one record per country, and define which data center is going to serve that country, but I recommend to create these records, considering you have one server in U.S., one in Europe and one in Asia.
- Record for Asia pointing to Asia's server
- Record for Oceania pointing to Asia's server
- Record for Europe pointing to Europe's server
- Record for Africa pointing to Europe's server
- Record for Israel pointing to Europe's server (I am sure it is better connected to Europe than to Asia)
- Record for Turkey pointing to Europe's server (Same as with Israel)
- Default record pointing to United States' server (You must have a default record, this is important)
Configuring VPS servers to work as your private CDN
This is the way I have configured my network, you may choose a different way.
- One server in New York
- One server in Amsterdam
- One server in Singapore
The real application or website should be running in one of those servers, let's assume it is Amsterdam's one, and let's assume you have Nginx serving Wordpress. On the other two servers varnish will be installed. You can read how to configure Varnish for Wordpress here
Just be sure to have varnish listening on port 80, this is done by editing /etc/default/varnish on Ubuntu server and find this lines to make them look like this:
DAEMON_OPTS="-a :80 \
             -T localhost:6082 \
             -f /etc/varnish/default.vcl \
             -S /etc/varnish/secret \
             -s malloc,256m"
Also edit the file /etc/varnish/default.vcl and be sure to have this lines:
backend default {
    .host = "10.10.10.2";
    .port = "80";
}
Change to IP to point to the server where your Nginx and Wordpress are, the port should be 80, as that server is also serving directly to visitors from Europe and Africa, if you are serving static content and not Wordpress, that should be enough, for Wordpress, read the instructions on Varnish site.
On the Nginx server add these lines in http or server block to make Varnish cache your files.
location ~*  \.(jpg|jpeg|png|gif|ico|css|js)$ {
   expires 365d;
}
If you are using Apache use these lines on .htaccess file
<filesMatch ".(ico|pdf|jpg|jpeg|png|gif|js|css)$">
Header set Cache-Control "max-age=31536000, public"
</filesMatch>
Restart all servers, and check that everything is working, the best way is to enter each IP of your server in a browser, you should see a webpage, which may or may not be the one you want, but the default of your origin server, that is OK.
Conclusion and further optimizations
With the prices of CDNs like MaxCDN or Cloudfront you may not need to do this, but if you are like me and just like to have control on your servers, and like to tweak everything by you, then you can go this way, if you want even more performance add PageSpeed module to your Nginx server, you will not need any cache plugin on Wordpress if you go this way, just add this lines to your Nginx server configuration in the server block.
location ~ \.php$ {
	try_files $uri =404;
	fastcgi_split_path_info ^(.+\.php)(/.+)$;
	fastcgi_cache  detecnologia;
	fastcgi_cache_key $scheme$host$request_uri$request_method;
	fastcgi_cache_valid 200 301 302 5s;
	fastcgi_cache_use_stale updating error timeout invalid_header http_500;
	fastcgi_pass_header Set-Cookie;
	fastcgi_pass_header Cookie;
	fastcgi_ignore_headers Cache-Control Expires Set-Cookie;
	fastcgi_pass unix:/var/run/php5-fpm.sock;
	fastcgi_index index.php;
	include fastcgi_params;
}
And this one to /etc/nginx/nginx.conf in the http block
fastcgi_cache_path /var/cache/nginx/blog.detecnologia.org levels=1:2 keys_zone=detecnologia:10m max_size=1024m inactive=1h;
With that configuration, you will be caching all responses from PHP for 5 seconds, then it is almost imposible to take the server down.
Hope this gives you a guide to start your own CDN network for any service you have. Take this important considerations into account.
- Your origin server should set Cache-Control headers to make Varnish cache the results for static content
- Try to use PageSpeed module for Nginx or Apache depending on what you have on your origin server, and use Extend Cache with it.