LaTeX Tutorial
Introduction
This is just a small and simple tutorial, maybe just an introduction to LaTeX. I will try to keep improving it.
Definition
LaTeX is a document markup language and document preparation system for the TeX typesetting program. The term LaTeX refers only to the language in which documents are written, not to the editor used to write those documents. In order to create a document in LaTeX, a .tex file must be created using some form of text editor. While most text editors can be used to create a LaTeX document, a number of editors have been created specifically for working with LaTeX –Source Wikipedia Latex is essentially a markup language. Content is written in plain text and can be annotated with various 'commands' that describe how certain elements should be displayed. The Latex interpreter reads in a Latex marked-up file, renders the content into a document and dumps it a new file. Therefore, it's not an interactive system that is the de-facto method for document creation nowadays. –Source Osnews
Uses
LaTeX us used mainly to create books, and university documents, so is mostly used by professors and PhD students. But it might help you too.
It is great when you are creating memos, letter, CVs, and reports.
Total Control
LaTeX lets you have the total control of how your documents are going to look like. You just define sections, and write the text in plain text editors. When finished, you can define how each section is going to be formatted, and you compile the document to have a final version.
To change the style of the entire document or just a section, is really easy, and you do not have to navigate the whole document to pick up sections you want to change its format.
Portable
LaTeX is great at its portability, you can edit the source document under Windows, Linux or Mac, now a days you can even use your tablet or phone to edit plain text documents, therefore you can edit LaTeX documents on your iPad, or Android phone too.
Profesional Look
The quality of the finished documents of LaTeX is not comparable with the output of any Word Processor by the time of this writing. Specially if you are writing Math books, with lots of formulas, you better bet on LaTeX.
LaTeX will make your documents look, like if they were printed in a professional editorial.
It has pre-sets for the type of document you are writing, and will keep the best possible typography on your document, for it to be easily read. This is maybe not too important for small letters, but for larger documents like a report, it is a lot better to respect some rules, and LaTeX will do that for you.
Document Weight
This is another side effect I like about LaTeX documents, being them just plain text, transport them is really easy, even send them as email attachments is not a problem, no matter how many pages you may have.
Collaboration
When you are using plain text documents, you can easily start a collaboration group. Lots of people can work on the same document a the same time. Just put it on git and start your collaboration group.
Learning LaTeX
Are you already convinced that LaTeX is for you? Well, we are going to start learning it. This tutorial is just an introduction to LaTeX, and will leave you at a point where you will be able to create simple documents. From there you will continue learning while using it and facing different issues. Remember that the Internet is full of resources, and all you need is to know how to find the information.
Control Sequences
Control sequences are the commands in LaTeX language, they start with the back slash \, and tell TeX how to format the text in the document.
Special Characters
\ {} $ ^ _ % ~ # & have special meaning in the document and helps formatting and creating a well look document.
\: Usually start control sequences, they are followed by "commands" so to say.
{}: Delimit the characters where the control sequences are going to act
$: Is used to start and finish mathematical formulas
^: Produces superscripts, used widely in mathematical formulas
_: Produces subscripts, also used specially for mathematical formulas
%: Is used to introduce comments in the document, nothing at the right of this symbol is read when processing the .tex file
&: Is used in tables
#: Is used to specify arguments for the control sequences
Creating my first document
The first thing we will do is to install LaTeX:
- Working on Mac? Download MacTeX
- Working on Linux, Ubuntu maybe?
sudo apt-get install texlive-latex-base
Now, to create a simple document we will first declare the type of document:
\documentclass[10pt]{article}
That line will tell LaTeX that we are creating an Article type of document and that the font will 10 points height.
\documentclass[10pt,letterpaper,titlepage]{article}
In this other case, we are also saying LaTeX to use letter size paper.
\documentclass[10pt,letterpaper,twocolumn,titlepage]{article}
Now, we are also adding an order for it to create a two-column document.
\author{Guillermo Garr\'{o}n}
Lets specify the author of the document (Change to your name)
\title{Hello World}
Title of the document, the very well know "Hello World" title.
\date{November, 2012}
The date of document creation.
\begin{document}
That line specify the beginning of the real document, where you will start typing the content of your first page.
\maketitle{}
That will insert the title, which was defined above.
\newpage
In case you want to start a new page.
Formatting
We can use sections, subsections, bullets and numbered lists.
\section{Part 1}

\subsection{Part 1.1}

\subsubsection{Part 1.1.1}
That is for sections and subsections.
\begin{itemize} \item First item \item Second item \end{itemize}
Un-ordered lists
\begin{enumerate} \item First item \item Second item \end{eenumerate}
Ordered lists.
To add comments you need to insert % and the rest of the line will be taken as comment.
This is a sample document and its result in PDF
To make this file a pdf file create your document as a plain text file with .tex extension, then enter these commands
latex my_first_latex.tex
The output will be my_first_latex.dvi
dvipdf my_first_latex.dvi
The output will be my_first_latex.pdf
LaTeX margins
Page Margins and page size are really important parameters if you want to have a neat and nice print of you work.
First lets see how to declare the paper size, that is declared with \documentclass control sequence.
\documentclass[10pt,letterpaper,titlepage]{article}
Now, this picture is going to help us know what variables to use to set the margins.
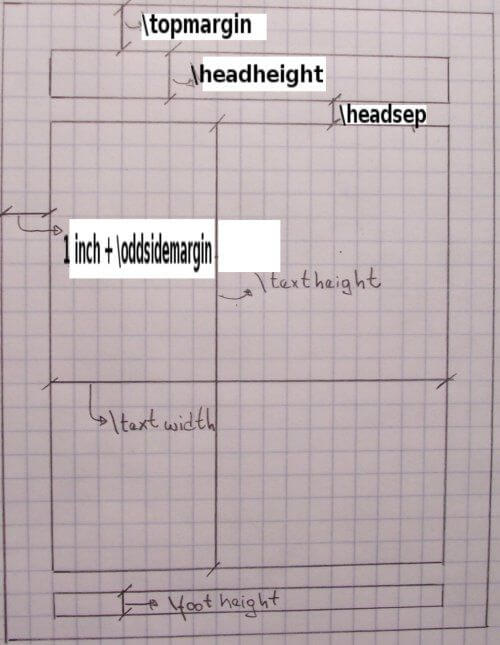
As you can see you need to declare the topmargin, and to declare the bottom margin, you will have to add topmargin + textheight +footheight, and subtract that from the paper size, that is going to be your bottom margin.
It is the same with right and left margins. Just define the right margin with oddsidemargin, you have to consider that there is already one inch (2.54 cm) of margin so, if you want something less than that you may use a negative value for oddsidemargin. For the left margin you have to add (1 inch + oddsidemarging + textwidth - paper width).
evensidemargin control sequence, is used to set the right margin on even pages, in case you are going to print both sides of the paper.
Figures
Any good book or manual, will need some illustration, and LaTex has a way to address that too.
When there is the need to insert images, this is the way to do it.
The first thing you need to do is to add this line below the documentclass control sequence.
\usepackage{graphicx}
Then go to the place of the document where you need to insert the image and use this code:
\begin{figure}
\includegraphics[scale=0.20]{ptop.eps}
\end{figure}
where ptop.eps, is the encapsulated post script graphic you may want to add. To scale the picture to the right size use the option scale. In the example above, we are scaling the image to 20% of its original size.
You can use jpg images too, but it is preferable to use eps (encapsulated post script) files.
To insert png or jpg files you need to specify its size lets say in mm, and not a scale.
\begin{figure}
\includegraphics[width=80mm]{ptop.png}
\end{figure}
\begin{figure}
\includegraphics[height=40mm]{ptop.jpg}
\end{figure}
To use eps instead of jpg or png, you can use gimp or dia. Gimp is available for both Linux and Mac.
To create eps files with Gimp, just save as eps file.
If you are on Linux, and you like the command line interface as much as I do, you can go with this:
dia -e ptop.eps -t eps-builtin ptop.dia
That is after creating you diagram.
To compile documents with images inserted, you need to run the following commands:
latex document.tex

dvips document.dvi

ps2pdf document.ps
Tables
Now we'll work with tables, this is not as easy as in Word, but a lot more flexible. Lets work:
\begin{tabular}[pos]{table spec}
Where:
pos can be:
- b = bottom
- c = center
- t = top
table spec can be:
- l = left-justified column
- c = centered column
- r = right-justified column
- p{width} = paragraph column with text vertically aligned at the top
- m{width} = paragraph column with text vertically aligned in the middle (requires array package)
- b{width} = paragraph column with text vertically aligned at the bottom (requires array package)
-
= vertical line -
= double vertical line
We now have the tools, put them to work, here is the code for our first table:
\begin{center}
\begin{tabular}{||p{2.5cm}|p{2.5cm}|p{2.5cm}|p{2.5cm}|p{2.5cm}|p{2.5cm}||}
\hline
\textbf{Column 1} & \textbf{Column 2} & \textbf{Column 3} & \textbf{Column 4} & \textbf{Column 5} & \textbf{Column 6} \\ \hline
Linux & is  & a  & great & operating & system \\ \hline
xx & xx & xx & xx & xx & xx \\ \hline
\end{tabular}
\end{center}

The table is created, but it will be better if we explain a little bit what we have done here:
\begin{center}: Is centering the table in the document\begin{tabular}: Start with table itselfp{2.5cm}: Specify each column of 2.5 cm width-
and will create the borders of our table. \hline: Draws the horizontal lines
If you do not assign a specific width with p{width} you will have some bad results like this one:

The text is not wrapped, and it exceeds even the width of the paper.
Cross Platform LaTeX editor
Texmaker is a free, modern and cross-platform LaTeX editor for linux, macosx and windows systems that integrates many tools needed to develop documents with LaTeX, in just one application. Texmaker includes unicode support, spell checking, auto-completion, code folding and a built-in pdf viewer with synctex support and continuous view mode. Texmaker is easy to use and to configure. Texmaker is released under the GPL license –Source: Texmaker Site
According to Wikipedia, some of their features are:
- Document and section templates
- LaTeX-related programs can be launched
- BibTeX database management
- An outline or "structure view"
- Logfiles during LaTeX compilation and the ability to "step through" source errors that are discovered by the compiler
- An integrated LaTeX to HTML conversion tool
- Integrated PDF viewer
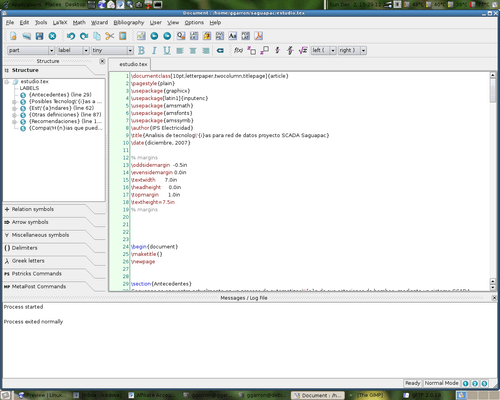
Screen Shots
Texmaker on Linux
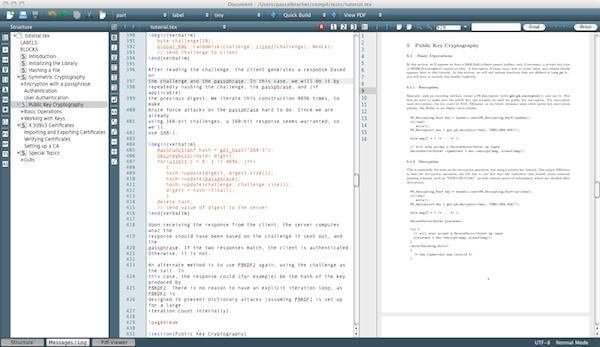
Texmaker on Mac
Download it for your platform, and start creating LaTeX documents with easy.
Using Markdown
There is also another method to create LaTeX documents, and it is maybe simpler.
Using Markdown Syntax. You can then convert those documents to TeX or directly to PDF.
pandoc -s input.md -o output.tex
Learn more about how I use Pandoc
Last edit on: December 03, 2012
By: Guillermo Garron